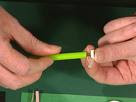
This video will show you how to make
a 3d origami module using triangles..
February 27, 2009
February 25, 2009
3D ORIGAMI...

Origami is created by folding small squares of paper
into various shapes 3D Origami takes that tradition
to the next level by combining smaller origami projects
into three-dimensional structures.
These impressive and seemingly difficult sculptures
are deceptively easy to make.
Each solid object is formed from simple folded units.
The works include cranes, swans, turtles, owls, penguins, pineapples, sunflowers, baskets, hats, kittens, rabbits, and others.
Each of the intricate projects begins with a small rectangular piece of paper folded into a tiny, "magical" triangle."The paper triangles can be folded from A4 sized paper". By combining lots of such "magical" triangles in various positions, you can build up ornamental objects that are solid and three dimensional. It's so much fun you won't believe what you have created before you know it.
3D Origami is indeed for those who enjoy adventure and is also sure to engage fans of the craft as it opens up a whole new world of delightful projects.

February 22, 2009
HOW TO QUILLING..?

Quilling is a paper craft, specifically the art of rolling thin strips of paper around a needle-like tool, then shaping those coils into intricate shapes and designs.
Things you needed:
- strips of paper of varying colors.
- a slotted quilling tool.
- white glue.
- a toothpick.
- scissors.
- a ruler.
STEPS:
1.Insert the end of the paper into the slot of the quilling tool.
2.Turn the slotted tool towards you. Place your thumb or index finger at the very tip of the slotted tool.This will prevent the paper from slipping off the tool.Use the other fingers to guide the strip of paper so that it rolls into an even plug (called a tight coil).

3.When done, turn the slotted tool a quarter turn away from you. Pull the plug out of the slotted tool. Hint.The coil comes off the tool neatly if you pull the coil off the tool and not pull the tool out of the coil.

4.Use a toothpick to apply a small smidgen of glue onto the free end of the tight coil. Use your finger, a clean toothpick, or forceps to press the free end onto the coil

5.When dry (about 5 seconds), you will have a tight coil. These can be used to make flowers, grapes, eyes and more.

If you have never seen paper quilling before, prepare to be amazed at the intricate and beautiful designs you will see.

QUILLING HISTORY...

It is believed Quilling has been practiced since ancient Egyptian and/or 4th Century Grecian times. Although they obviously would not have used paper in the 4th century, it is believed the Greeks used thin metal wires to decorate containers, especially boxes, and Egyptian tombs have been found containing similar wire shapes akin to modern quilling.
While some sources speculate that quilling originated in Ancient Egypt, others connect the craft with the invention of paper in China around 105 AD. In any case, the first known quillers were members of cloistered religious orders in Europe during the Middle Ages who used individual bird quills as a rolling tools. Later on, 15th-century nuns collected gilt-edged parchment that fell off bibles to quill decorative designs for medallions. With the wider availability of paper, French and Italian nuns achieved more intricate work in the 16th-and 17th-centuries, decorating relics and religious images with quilling as ornamnetation. Walls and altars of poorer churches displayed these icons and backgrounds quilled with gilded or silvered paper, mostly indistinguishable from genuine gold or silver filigree work.
In the late 18th- through 19th-centuries, Quilling became more popular as paper became less expensive and more widely available. As it became popular for decorative crafts, it was thought to be a suitable hobby for popular ladies and "ladies of leisure" in England. From there, the hobby was brought to the American Colonies and to New England.
For unclear reasons, quilling's popularity faded during the late 1800s and failed to make a resurgence until the 1950s, sometimes deccorating paper greeting cards or adorning framed documents. Without preservation, quilling is just as fragile and fleeting as other paper crafts.
Many museums around the country and abroad have examples of antique work either on display or stored behind the scenes.With the introduction of modern paper and techniques, Quilling is currently enjoying a wall deserved revival.
February 20, 2009
HOW TO DECOUPAGE..?
 As we said that Decoupage is the art of decorating an object
 by gluing pieces of decorative paper to the surface
and coating it with a protective finish.It needs simple materials
if you have them you can do it urself and
will be surprised with how easy it is.
Materials Needed:
- Glue
- Paintbrush
- Lacquer, varnish, or decoupage finish
- Scissors
- An object to cover with decoupage
- Decoupage materials (newspaper and magazine clippings, paper cut-outs, etc.)
- Paintbrush
- Lacquer, varnish, or decoupage finish
- Scissors
- An object to cover with decoupage
- Decoupage materials (newspaper and magazine clippings, paper cut-outs, etc.)
STEPS:
1. Get your materials ready. Select an object you want to decorate, and collect materials to decorate it with. You can use just about any flat materials for decoupage, including cards, tissue paper, wrapping paper, paper shopping bags, magazine clippings, thin fabric pieces, or (of course) decoupage paper.
2. Cut your cut-outs. You can use pieces of paper whole, or you can cut them to make interesting shapes and designs. Use scissors or a craft knife to cut around out the shapes you desire, holding the scissors so that they are angled slightly to the right. This will create a smoother, beveled edge.
3. Plan your decoupage project. Make a sketch of the layout or simply put the cut-outs into place without gluing them and then take a picture so you'll remember the arrangement.
4. Prepare the surface. Make sure the object you are decorating is clean and dry, fill in deep gouges, and sand it down to remove bumps and imperfections if necessary. If you want to paint it or refinish it, you should do this before pasting anything onto it. For some materials, such as wood and metal, you may need to prime the surface with a coat of latex paint to help the cut-outs stick better.
5. Use a glue appropriate for both your surface and your cut-outs. You can generally use plain white glue, and you may find it easier to work with if you dilute it by thoroughly mixing it with some water in a bowl.
6.Apply the glue. Use a paintbrush to brush a thin layer of glue onto your surface. If you can work quickly, you can brush the entire surface at once. You can also brush the glue onto the backs of the cut-outs. Make sure you apply the glue evenly and remove any excess.
7. Glue the cut-outs, piece-by-piece, to the object. Lay a piece of your cut paper onto the area to which you applied the glue. Apply the paper carefully to avoid bending or crumpling it, and smooth it out with a brayer (a small roller) or with your finger, rubbing outward from the center. Repeat with each piece. For a more complex appearance, make several layers of cut-outs. Lay down the first layer and then glue subsequent layers on top, partially overlapping the layers below.
8. Let glue dry. Make sure the whole piece is thoroughly and completely dried before proceeding. If you are applying several layers, make sure each layer is dry before starting on the next.
9. Apply varnish or lacquer. Seal the decoupage with a couple coats of an appropriate sealant, such as specially-formulate decoupage finish (available at art and hobby stores), varnish, or lacquer. Let each coat dry thoroughly before applying the next.
10. Sand the sealed decoupage. When the sealant is dry, sand it with 400 grit sandpaper to remove imperfections. Use a damp cloth to remove residue from sanding. Do not sand until you have enough coats of sealant to completely cover the underlying surface and cut-outs.
11.Continue applying varnish or lacquer. The unique appearance of decoupage is created by multiple coats of sealant. The number of coats is up to you. Depending on the sealant you are using, you may need as few as 4 or 5. Some decoupage artists use as many as 30 or 40 coats. Remember to let each coat dry before applying the next, and sand the decoupage after every couple coats for best results.
February 18, 2009
DECOUPAGE HISTORY..
Decoupage is a creative, decorative and timeless art form with its roots in Venice of 300 years ago.It has a long and fascinating history that can be traced back to a variety of styles from many distant countries.
As far back as the 12th century, Chinese peasants were creating paper cutouts in vivid colors to decorate windows, lanterns, gift boxes and other objects. This Chinese practice and expertise with scissors is thought to have come from Eastern Siberia, where cutout felt figures and designs were decorating objects in the tombs of Siberian nomads. The tombs date back to before Christ.
German and Polish artisans have also been using cut paper for decoration over several centuries. Polish women and children in particular, developed enormous skill with folded colored papers which they cut freehand into geometric shapes and stylized birds, animals and flowers.
However, it is the late 17th century lacquer work from the Far East, mostly in the form of furniture, which we tend to associate with today’s decoupage. Oriental lacquered objects became fashionable in Europe and in no time demand exceeded supply.
Apprentices were employed by the artisans to hand-color the prints and engravings of leading artists. These were then cut out, pasted to the surface to be decorated and covered with many layers of lacquer to produce furniture and objects that closely resembled the unique and popular work being brought by traders from China and Japan.
Parallel to this development, the wealthy classes were using master painters to paint their furniture and decorate their walls and ceilings. However, in time, because of excessive demand and the fact that many people could not afford the works of the masters, an alternative form of decoration developed. Drawings from the artists of the day were cut out, glued down and covered with lacquer to resemble original paintings. From this derivation came the alternative term" l’arte del povero"--"poor man’s arts".
During the 18th and 19th centuries this art form flourished throughout Europe. It even infiltrated the court of Louis XV. Ladies with an artistic bent snipped away at pictures and pasted them onto hatboxes, wig stands, fire screens and toiletry objects, keeping themselves amused for hours. The works of Boucher, Watteau, Fragonard, Redoute, Pillement and many other distinguished artists came to this sticky end. Many magnificent examples of fine cutting, coloring and design can still be found today on bureaus, chiffoniers, armoires and similar pieces of furniture as shown in the photograph.
Today, decoupage is having a stimulating and virile revival throughout the world with active guilds in America, South Africa, Australia, England and Japan. We owe our current knowledge and techniques in great part to the colorful Bostonian. The National Guild of Decoupeurs was formed in the USA in 1972 and is greatly responsible for promoting this fascinating and beautiful art in its finest form.
With such a long and varied history, it is not surprising that decoupage is still evolving with new styles.
IRIS FOLDING...
 What is Iris folding..?
Iris folding is a fun and easy paper folding technique that can be used to make greeting cards, on scrapbook pages, or designs can be framed and hung on a wall. The texture and depth that you feel when handling an iris folded greeting card or scrapbook page is the best part. The online photos can't possibly duplicate this.
It is simply arranging strips of folded paper in a pattern that resembles the iris of an eye or camera.It is very versatile in that any type of easy to fold paper can be used. Left over Christmas wrapping paper works great.
Materials Needed:
4"x5" piece of colored cardstock.
Iris Folding template or pattern.
Caps of decorative paper in various colors.
Cardstock or frame for mounting your work.
Duble-sided tape or photo tabs.
Sick glue.
Sissors.
Iris folding begins with a window or frame, then is built inward with folded paper strips to form the iris pattern. It is really an easy and beautiful art..


February 17, 2009
HOW TO MAKE AN ORIGAMI MODEL..?
As we said before that origami or the art of folding paper is an easy art. You just need a beautiful paper with the color and texture of your choice. You can get a variety of choices from stationary shops. You can work on simple pieces at first and then progress to more complicated designs whenever you are ready.
And to get a beautiful and easy model , u should know these few things:
1. Fold each crease very well.
Every crease needs to be flattened quite well for a successful model . You can reinforce a crease by running the side of your thumbnail along the fold, or even use some sort of tool. I sometimes use the end of a plastic ruler, that works well without damaging the paper.
2. Follow the instructions.
Every part of the instructions is important, so read each description carefully, and look at each picture closely. If you miss a piece of information, it could make the model more difficult than it has to be.
3. Be patient.
If you are just learning how to make origami, you have to realize that it is contemplative and relaxed activity, that is, you can't go rushing through the instructions as fast as you can. It won't take long for you to be very good at origami especially with the diagrams but when you are just starting give yourself a lot of time to work it out.
4. Have fun...
Now you can try to make a simple model, and if you find it too easy, well, simply go on to a harder one.Don't forget that your own concept and design should reflect your creation.
Now, let's see some models with their diagrams..


THE LEGEND OF ORIGAMI CRANES...

It's an ancient Japanese legend promises that anyone who folds a thousand origami cranes will be granted a wish by a crane, such as long life or recovery from illness or injury. The crane in Japan is one of the mystical or holy beasts.It may conceivably be the oldest bird on earth, there is fossil proof that they existed over 60 million years ago.
The Japanese refer to the crane as “the bird of happiness” the Chinese as “heavenly crane” believing they were symbols of wisdom.The crane has also evolved as a favorite subject of the tradition of paper folding " origami". It is said that a thousand folded cranes, one for each year of its life, makes a wish come true.
The Thousand Origami Cranes has become a symbol of world peace through the story of Sadako Sasaki a young Hiroshima survivor born just before the atomic bombing she developed leukemia as a result of the radiation ten years later, in her early teens. As the disease wasted her body, this young girl who was a local track star began to fold cranes in the ancient legend that if she folded a thousand cranes she would have a wish granted to be cured and well.
 The story began when Chizuko Hamamoto - Sadako's best friend -came to the hospital to visit and cut a golden piece of paper into a square and folded it into a paper crane. At first Sadako didn't understand why Chizuko was doing this but then Chizuko retold the story about the paper cranes. Inspired by the crane, she started folding them herself, spurred on by "the Japanese saying" that one who folded 1,000 cranes was granted a wish. A popular version of the story is that she fell short of her goal of folding 1,000 cranes, having folded only 644 before her death, and that her friends completed the 1,000 and buried them all with her. This comes from the book Sadako and the Thousand Paper Cranes. An exhibit which appeared in the Hiroshima Peace Memorial Museum stated that by the end of August, 1955, Sadako had achieved her goal and continued to fold more cranes.
Though she had plenty of free time during her days in the hospital to fold the cranes, she lacked paper. She would use medicine wrappings and whatever else she could scrounge up. This included going to other patients' rooms to ask to use the paper from their get-well presents. Chizuko would bring paper from school for Sadako to use.
During her time in hospital her condition progressively worsened. Around mid-October her left leg became swollen and turned purple. After her family urged her to eat something, Sadako requested tea on rice and remarked "It's good." Those were her last words. With her family around her, Sadako died on the morning of October 25, 1955.
The children decide to write to other children all over Japan to tell them of the story of Sadako and ask them to contribute money for a monument in her name to spread her message of peace. When the Japanese government learns of this plan they decide to rename a park in Hiroshima "Peace Park." There they erect a huge statue with a replica of Sakako holding up a giant crane.


February 15, 2009
ORIGAMI HISTORY...
Origami began approximately in the first century AD in China, where people discovered the simple thrill of folding paper into various shapes and forms. Many of these primitive methods survived to this day as basic origami shapes and moves. As the skill of making paper moved across the Eastern world the art became quite popular in Japan where it melded with the culture and religion at the time.At this time paper was an expensive and rare commodity, so to be able to "waste" it for origami was a hobby for only the rich. Many noblemen would create special boxes to include gifts in; combining an exhibit of skill and wealth at the same time. As the production of paper spread and it became cheaper and more available, more people began to fold and create shapes and forms. But the habit of conservation exists to this day where many Japanese can fold ornate creations out of the smallest slip of paper to avoid wastage.
One major problem of ancient origami was that the techniques and designs were all oral,passed on through the mother to the daughter much like the oral traditions in other parts of the world. While this was mostly due to illiteracy on the part of the majority of the people, it was also because of the methods and creations involved - many families treasured their skill with paper and didn't want outsiders to steal their creations. As a result, many techniques were lost over time as word of mouth proved insufficient to keeping these secrets alive.
In the late seventeenth century and the early eighteen hundreds the first manuals were published, including many traditional folding diagrams and creations for the reader. One major design was of a Crane, a sacred creature in Japan.
Origami has gained a widespread following as a hobby among adults Not only a hobby for some, it has become a forum for political and social causes. But in the end, it is still the simple art of paperfolding, open to anyone with a bit of patience and a lot of paper and time on their hands..
February 14, 2009
What is Origami.?
Origami is the Japanese word for paper folding." ORI "means to fold and" KAMI "means paper. Together, they form the word, "origami." It is an art form that has been handed down from parent to child through many generations. Origami involves the creation of paper forms usually entirely by folding. Animals, birds, fish, geometric shapes, puppets, toys and masks are among the models that even very young children can learn to make in just one sitting.


These are some models to see that is an interesting art or a creative hobby..


February 11, 2009
QUILLING
Quilling or paper filigree is the art of rolling thin strips of paper into different shapes and gluing the shapes together to form decorative designs
The paper is wound around a quill to create a basic coil shape and then glued at the tip and the coil shaped, these shaped coils are arranged to form flowers, leaves, and various ornamental patterns


.jpg)
DECOUPAGE
Decoupage, derived from the French word decouper, meaning to cut out, is the creative art of assembling, pasting and varnishing paper cutouts for decorating objects
The art of decoupage is actually quite simple... If you can cut and paste, you already know most of the techniques involved. Basically, you cut out pictures,you glue the pictures into an object, and then cover the object and pictures with a few coats of glue/decoupage medium to protect it
There are some decoupage objects..I wish u like it


Subscribe to:
Posts (Atom)